

Applying attributes
Now that you have an object on your page, it is time to apply a fill and stroke to it. These are called object "attributes."
Selecting and transforming objects
To move an object, or select it to apply a fill
or stroke, click the Selection tool ![]() . To select the star object you created,
click the black part (the stroke or path). Now you can move the shape around the page
by dragging it.
. To select the star object you created,
click the black part (the stroke or path). Now you can move the shape around the page
by dragging it.
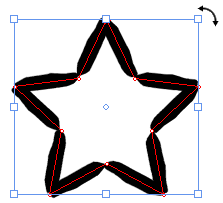
When you select an object on a layer, the object is surrounded by eight handles (in the corners and sides of the bounding box). With the Selection tool, click and drag on one of the corner Resize handles, dragging outward to increase the size of the star object, or dragging inward to decrease the size of the object. You can hold down the SHIFT key to maintain the height/width proportion.
You can rotate the object by placing the cursor immediately outside of one of the corner handles (you'll see the cursor change to indicate rotation) and dragging.
The cursor (above the upper-right corner handle) changes to indicate that dragging will rotate the object.
Note that because the object currently has no fill, you have to select or move the object by clicking its stroke. After you fill the object, you can click its fill or stroke to select it.
Filling the shape
The Appearance panel inside the Properties panel lets you apply stroke and fill attributes for the objects you draw with the drawing tools. You can apply fill and stroke attributes before or after you draw a path or object. When you select an object, it loads all the attributes for that object into the Properties panel so that the next object you draw will have the same fill and stroke.
The star shape currently has a stroke but no fill.

To apply a Fill attribute to the star object, first make sure the object is selected, and then follow these steps:
- Click the Fill icon (the first icon in the upper-left corner of the Appearance panel).
- Click one of the swatches along the top of the Appearance panel, or click the colored rectangle (the color picker) in the lower section of the Appearance panel to select a fill color. You can change the hue by clicking the color bar to the right of the rectangle.
You also have the option to fill objects with
gradients and images. For example, click the third icon in the Fill
area  to apply a gradient fill and notice that the lower section
of the Appearance panel changes to a gradient spectrum. To remove an object's fill
attribute, click the first button in this section: the No Fill icon
to apply a gradient fill and notice that the lower section
of the Appearance panel changes to a gradient spectrum. To remove an object's fill
attribute, click the first button in this section: the No Fill icon  .
.
Changing the stroke
To change the stroke on the star-shaped object, select the object (if it isn't already selected) and click the current brush stroke button the Appearance category of the Properties panel. Expression Design displays the Brush Stroke gallery, listing all of the choices broken down into categories. Click a brush stroke to apply it. When you find a stroke you like, click anywhere else in the document window (or press ESC) to close the gallery. The stroke surrounding the star object is now replaced by the new stroke you chose.
The Brush Stroke gallery in the Appearance panel

If the new stroke is too thin or thick, change the stroke width by adjusting the Width slider (located to the right of the brush stroke style in the Appearance panel). To increase the stroke width, drag the value in the slider up or to the right. To decrease the value, drag it to the left or down.
You can also change the stroke width meter by clicking it once to activate it. Type a value, and then press ENTER.